
Showing posts with label Bag. Show all posts

Monday, 18 August 2014

.Sidekick Tote.

Last week we said goodbye to the our lovely family daycare lady. Once my kids stop day-time naps, I send them to her house once a week so that I can squeeze in a work day amidst the business of life with four kids. She isn't just any family day carer either - at Cindy's house the kids do the most amazing things! They get dirty (like really dirty!) discovering all sorts of things about nature, they make their own paper and do crafts from recycled materials, lots and lots of cooking, felting, the most imaginative role play including a special fairy who steals children's lunch boxes and hides them around the house and so much more. Going to Cindy's house was such a treat for my children and we were sad to see her retire.
 
I wanted to make Cindy something special to say thankyou and goodbye and thought that she might like a new bag to tote her belongings around in...one that is big enough just for her stuff now that she isn't carting around nappies and wipes and drink bottles for the littlies!
After a quick look through my patterns I settled on the Sidekick Tote from Noodlehead. I made a Sidekick Tote for myself a couple of years ago and still use it all the time.
I made the large sized bag with the flat front pocket. For the exterior fabric I used some linen/rayon blend fabric with shot cotton on the top section to add a colour pop. The pocket fabric is an oldie by Echino and the bag is lined in the same. Once again, the recessed zipper top (that Anna does so well in her patterns) is my favourite feature of the bag. The only thing I did differently is to use cotton webbing for my handles because I really don't like making bag handles from fabric! And I don't think they look good after lots of use either.
SUPPLIES:
Noodlehead, Sidekick Tote pattern
Robert Kaufman Brussels Washer linen blend in natural
Kaffe Fassett shot cotton in eucalypitus
Echino Bonbon in green

Wednesday, 26 March 2014

.Mini Messenger: a free pattern.


Good morning friends! I've got a brand new FREE pattern to share with you today in conjunction with Sarah Jane's new fabric release and blog tour for Wee Wander. This fabric is absolutely to die for, I know that people are going crazy for it and it is by far my favourite collection Sarah Jane has produced. You can view the full range here.

 MINI MESSENGER
This little satchel bag came about because I got tired of carrying SO MUCH stuff in my bag every time we left the house! As well as the usual drink bottles and snacks, I'd end up with books, pencils, little toys and other treasures to cart around and I decided enough was enough! My kids are big enough to carry their own stuff now but they needed something practical to carry it around in.
Mini Messenger is an ideal size for kids. My kids in particular are crazy about sketch books at the moment, if they have a sketch book and a handful of pencils then they are happy. I usually buy them the A5 size as they are more portable so I designed this bag to fit A5 size. The finished bag measures 7"x10".
I've used two coordinating prints for my bag, but you can use more or less depending on what you would like the finished bag to look like. It is a really quick and easy sew, especially when you use the webbing for the strap instead of having to make your own strap out of fabric.
As well as being a great bag for your own kids to help you lighten your load, the Mini Messenger makes a fantastic gift to give to little friends. Fill it with a couple of treats and you're set! And I do suggest you use some Wee Wander fabric for your Mini Messenger - it's gorgeous!
As always, I love to see what you make with my patterns so feel free to send me some pictures or add them to the Make It Perfect Flickr group!

Tuesday, 14 May 2013

.Super Tote.

I had no intentions to make myself a nappy bag. I've got lots of big bags hanging around that I was planning to use for the baby...until I saw Anna's new Super Tote pattern. And then my plans changed.
 
Another project added to the list of things to do before baby arrives!! But I couldn't resist, the bag is great - really roomy with four elasticized side pockets inside...
...and my absolute favourite part - the zipper! Nothing worse than having a choc-a-block full nappy bag with no closure at the top and having everything fall to the ground when your bag topples over. Actually, I think the zipper was what sold me!

As with Anna's Sidekick Tote pattern, the Super Tote was simple to put together. Anna has really outdone herself on this one though simplifying lots of steps and features that seem like they should be really tricky to master. 

I'm trying really hard to dig into my ridiculously out of control fabric stash and use up what I've already got at the moment. I was tempted to lash out and purchase some new fabrics for the bag but made myself stick with what I had in the cupboard. I like the fresh combination of colours - especially the purple and aqua together.

So, I'm partly organised...nappy bag made, but still haven't packed the hospital bags! Maybe a good job for today seeing as I'm due in 9 sleeps!? 
SUPPLIES:
Super Tote pattern by Noodlehead
Prints Charming cotton drill from Spotlight
Art Gallery, Urban Mod, Pointelle in Celeste
Alexander Henry, Heath in Metal
Grey/purple-toned cotton drill

Sunday, 18 November 2012

.Leather bag.

 
It was a long time ago that I dreamed about sewing a leather bag. Two and a half years ago to be exact. Then I couldn't decide on a pattern to use and didn't know what style I wanted and was worried that it wouldn't work with leather, so the idea was pushed to the back-burner and the leather folded up and put away for another time.
I would look at the leather from time-to-time but still undecided on what pattern to use, never went any further. Until recently Anna from Noodlehead released her latest pattern, the Sidekick Tote. I knew it would work perfectly for what I had in mind and was excited to get sewing.
Anna sent me the pattern, but my sewing plans were put on standstill while I had to wait for the bag hardware to arrive. Finally on Friday night I got sewing and finished this beauty in one night! It was a great sew, very straightforward and easy.
I was a little worried about sewing with leather and couldn't find my leather needle anywhere, so ended up using a regular needle in my sewing machine and it was amazing. Even over several layers of leather and fabric, I had no problems. I did go slowly when it was super thick (like topstitching through the side seams on the top band) but there were no problems at all. The leather is really lovely and soft and thin though (I bought it from a local saddle maker, if you're wondering where I got it from).

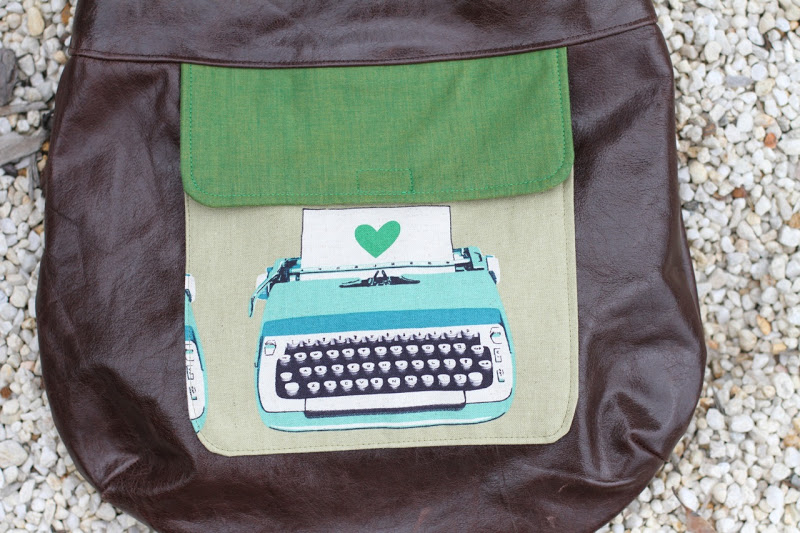
It took me awhile to settle on a fabric for the pocket and lining. I really wanted to steer away from anything floral or too "pretty" and am so happy with my choice of typewriter fabric from Melody Miller. I haven't had this fabric for long, but absolutely love it and only wanted to use it for a special project. The front pocket dimensions were changed a little to make sure that I got the whole typewriter in the middle.


The thing that really won me over with the bag pattern is the recessed zipper top. AWESOME! Now I can throw my bag around and not worry about things falling out or the kids getting into things too easily. I used a shot cotton for the solid green fabric. Because shot cotton is a little thinner than regular cotton, I used two layers to give it extra strength and stability.  I was going to use the typewriter fabric for the handle, but the print was too large and messy, so I was happy to find this brown bag handle webbing in my stash and used that instead. Strong and practical - I wish it was slightly darker, but am still happy with it.

Here's a shot of the back of the bag - it looks just as lovely without a fabric pocket, just using the leather on it's own. I'm loving it and going to make another trip into the saddle maker's shop this week to see what else he has lying around.
Thanks, Anna for an awesome pattern - she rocks at bags and thinks of all the little things that are appreciated when you are out and about.

SUPPLIES:
Sidekick Tote pattern from Noodlehead
REAL brown leather
Melody Miller, Ruby Star Rising, Typewriters in Neutral
Kaffe Fassett, Shot Cotton in Moss


Monday, 25 October 2010

.Cosmo Bag.

Here is my Cosmo Bag from Amy Butler's Style Stitches book.  After this and the Reverible Everyday Shopper, I think I've got my need for bag sewing out of my system now - thank goodness!  I do quite enjoy sewing bags, but really, how many do you need?!  And what do you do with the old ones you have sewn and are still in pretty good condition but you don't use anymore because you have new ones???!!  Throw them away?  It just seems wrong to thrown something you have made in the rubbish!
Anyway, I digress...here is the Cosmo Bag:
There are a lot of details I am really enjoying about this bag...the big exterior side pockets are perfect for stashing keys, your phone, other bits and pieces that always get lost in the bottom of your bag.  I especially love the little strip of contrasting fabric at the top of the pocket that also makes up the pocket lining.

And the closure is something I have never seen before, the pointed end and chunky loop add a funky look to the bag.  The button is supposed to be fabric covered but I didn't have any big enough.  This blue button was my "makeshift" button, but it has grown on me and I think I'll keep it there.
Another thing I am really loving about this bag and the Reversible Everyday Shopper is the bottom and side panels that help to give the bag more of a square shape and make it sit nicely when it is full of bulky items.  All of the other bags I have made have a box-bottom, but never sit as nicely when full.
It also gets my "big bag" tick of approval!  I am really pleased with the fabric I chose for this bag.  Erin McMorris is one of my very favourite fabric designers and I don't think she gets enough praise for her awesome work.  I wanted this bag to have a bit more of a classy look, but still funky - so that I could take it to the beach or out for dinner and the green is really making me happy :)


SUPPLIES:
Erin McMorris, Weekends, Lollies in Red (handle)
Erin McMorris, Weekends, Hopscotch in Lime (exterior bag)
Erin McMorris, Wildwood, Pressed Leaves in Fuchsia (lining)

Saturday, 9 October 2010

.Thanks Amy!.

Not surprisingly, she's done it again.  I'm a sucker for Amy Butler books (and fabric and patterns...) and am very impressed with her new book, Style Stitches.  
I'm pretty picky when it comes to bag patterns and find it quite difficult to find ones that suit my needs.  They need to be big (I have tried small bags and they don't work!), a bit stylish - not too "cute", easy to carry, a big pocket or two and quick and easy to make. Previously, Amy's Nappy Bag and Birdie Sling patterns have been my "go-to" bag patterns.  But after a few years of using these bags, they are turning up everywhere and I have been ready to try a new bag pattern for awhile.  Enter Style Stitches...a book full of BAG patterns!
It really is a great book - there are at least 4 patterns I am very sure I will be trying out, which is a good indicator of a worthwhile purchase!  Just after I received the book, I got an email from Quilt Home with a newsletter special of 40% off their Home Dec fabrics.  A few of the bags I wanted to make specified Home Dec fabric, so I made the most of the special and purchased some.
There has been a bit of a sewing-lull around here lately.  I've got a lot of projects on my "to-do" list but the motivation just isn't there.  I get like this from time to time and just have to wait for the desire to resurface - not so good when Quilt Market is just around the corner though and I really need to get designing some new patterns and sewing some new samples for it!
Last night a little window of desire surfaced though...Jaron was out at basket ball, the kids went to bed (AND sleep) early and the house was mostly tidy so I pulled out my sewing supplies and spent the evening sewing the Reversible Everyday Shopper.
I was very pleased that this bag only took me two hours from the time I traced and cut out the pattern pieces to the end!  It was very simple to sew, gotta love an instant-gratification sewing project!
And, yep, it ticks all of the boxes...big (in fact, it is massive!), stylish, easy to carry, pockets and quick and easy to make!  My intention for this bag is to carry all of the "kid stuff" that goes with me from day to day.  They are a bit old for nappy bag attire now and I find that my bag is stuffed with 3 lunchboxes, 3 drink bottles, 3 hats, 3 jumpers, some wipes, a nappy as well as my essentials.  My bag is always overflowing, but this one is definitely going to fit the mould!  It will also be perfect for taking to church and filling with colouring books, pencils, books, snacks and bits and pieces to keep the kids quiet.
Other Style Stiches projects that have caught my eye...

Cosmo Bag (another good, big, carry-all) - I've selected my fabric for this one already and am looking forward to making it: 
And the Blossom Handbag.  This one is really cute - roomy, but less "Motherly" than my other bags!  Good for when I am going out without all of the kid paraphernalia!!  I want to make it using Home Dec fabric so that it is nice and sturdy so will have to keep my eye out for the perfect fabric to use:
And, I'm happy to say that I think the sewing-bug is slowly creeping back - phew!

SUPPLIES:
Amy Butler August Fields, Fresh Start in Tangerine
Amy Butler August Fields, Graceful Vine in Grey

Thursday, 24 June 2010

."Peek-A-Boo" Toy Sack Tutorial.

Giveaway now closed - feel free to still leave a comment though!

{Thanks for the Toy Sack-love :) If you need an introduction to these toy sacks then read my previous post here.}

This is a long tutorial...stick with me...if you keep scrolling all the way down to the end, I've got a toy sack to GIVE AWAY! So if you aren't a sewer or want a toy sack without any work, now is your chance to enter :)


"Peek-A-Boo" Toy Sacks Tutorial!!!

To make a "Peek-A-Boo" Toy Sack, you will need:
One 10 3/4" x 12 1/2" rectangle of fabric cut from exterior and lining for front of bag
One 2 1/2" x 12 1/2" rectangle of fabric cut from exterior and lining for front of bag
Two 4 1/2" x 2 1/2" rectangles of fabric cut from exterior and lining for front of bag
One 16 3/4" x 12 1/2" rectangle of fabric cut from exterior and lining for back of bag
One 4 1/2" x 8 1/2" rectangle cut from tablecloth plastic for window
One 1 1/2" x width of the fabric (40"-44") strip cut from contrast fabric for drawstring
One 2" x width of the fabric (40"-44") strip cut from contrast fabric for casing

FYI:
* Exterior fabric is blue/white zigzag
* Lining fabric is white
* Casing and drawstring fabric is red
* Plastic window is clear PVC "tablecloth" plastic - this comes in 3 thicknesses (from Spotlight), I use the middle thickness because it is strong but thin enough to use your regular sewing machine needle on.


Step 1.
Take one of the 4 1/2" x 2 1/2" rectangles of fabric cut from exterior and lay on the table with right side facing up. Take your rectangle cut from plastic sheet and lay on top of exterior fabric, matching up short edge of plastic strip with long edge of exterior fabric. Take one of the 4 1/2" x 2 1/2" rectangles of fabric cut from lining and lay on top of the plastic sheet with right side facing down. Match up raw edges (the plastic sheet should be sandwiched between the exterior and lining fabrics). Using pins on the plastic sheet will make holes, to hold in place, use a few paper clips along the raw edge.


Sew together along paper clipped edge, using 1/4" seam.

Repeat to attach other 4 1/2" x 2 1/2" rectangles of fabric cut from exterior and lining on the opposite short edge of plastic sheet. Fold fabric out so that wrong sides are touching. You can't iron near the plastic sheet, so firmly press seams flat with your fingertips.

Step 2.

Take the 2 1/2" x 12 1/2" rectangles of fabric cut from exterior and lining and attach to the bottom long edge of the plastic sheet and side pieces of fabric in the same way you attached the side pieces. Match up raw edges and pin or paper clip into place. You can use pins where you are joining fabric to fabric.

Sew along pinned/paperclipped edge using a 1/4" seam. Open out fabric so that wrong sides are touching and firmly press seams flat using fingertips.


Step 3.

Take the 10 3/4" x 12 1/2" rectangles of fabric cut from exterior and lining and attach
the top long edge of the plastic sheet and side pieces of fabric in the same way you attached the bottom piece. Open out fabric so that wrong sides are facing and firmly press seams flat using fingertips.

{Exterior of front of sack}

{Lining of front of sack}

Topstitch about 1/8" away from the edge around the entire window.


Step 4.

Make a hem at the top of the sack by taking front of sack and folding the right side of the top raw edge of exterior and lining fabrics under 1/2". Take the 16 3/4" x 12 1/2" rectangles of fabric cut from exterior and lining and fold the right side of the top raw edge of both pieces of fabric under 1/2".

Take lining back piece and lay on the table with right side facing up. Place front of sack so that exterior is facing up and front lining is facing back lining piece . Take exterior back piece and lay on top of the stack with wrong side up so that right sides of exterior fabric are facing.


Match up top folded edges of all four layers of fabric so that they are perfectly aligned (this will ensure a neat finish to the top hem of your sack.) Match up raw side and bottom edges of sack and pin into place. You should have four layers of fabric pinned together.


Sew together around pinned edge using a 1/4" seam. Trim bottom corners off sack, making sure not to clip your stitching.

Turn bag right sides out, pushing lining fabric inside exterior. Match up top folded edge of sack and pin front exterior and lining pieces together and back exterior and lining pieces together. Sew around pinned edge, close to the folded edge of the fabric.


Step 4.
Take strips cut from contrasting fabric for casing and drawstring and make a center fold by folding in half, length ways, so that wrong sides of fabric are touching. Open out and fold both long raw edges of fabric in towards the center fold.

A much, much easier way to do this is to invest in a couple of bias binding makers...they are GREAT! Very affordable (I think about $10 each?) and make light work of making binding. The two I used for this project are made by Clover. The pink one - 18mm is used for the 1 1/2" wide strip of fabric and is the size I use most often when making clothing. The blue one - 25mm is used for the 2" wide strip of fabric. (Nicole Mallalieu has a great tutorial showing how to use these cool gadgets on her blog).

Set thin drawstring strip aside for now.


Step 5.

Take thicker strip for casing and fold one short raw edge under about 1/2". Press.


Align folded edge of strip with side seam of sack. Position strip so that it is sitting about 1/2" from top edge of sack and pin into place. Continue pinning until strip has made it's way around the entire sack.


When you get back to the side seam you started at, trim the strip so that it overlaps the beginning of the strip about 1/2", then fold short raw edge of the end of the strip under 1/2" and align folded edge with the side seam of the sack. There should be an opening between the two folded ends of the strip, this is where you will insert your drawstring. Pin into place.


Sew around the top and bottom edges of the strip, close to the edge to secure strip into place and form casing for drawstring.


Take thin drawstring strip and fold in half, length wise once again so that raw edges of the strip are enclosed. Sew down opened edge of the strip, close to the edge to secure.


Attach a safety pin to one end of the drawstring and thread through the casing. Tie a knot at each end of the drawstring.


Snip stray threads and you are done!!

If you make a "Peek-A-Boo" Toy Sack, I would love to see it! Send me an email or add your photo to the Make It Perfect Flickr Group.


Okay - for the giveaway...

To win THIS "Peek-A-Boo" Toy Sack (made from Paula Prass, Summer Soiree, Chevron in Aqua) as well as eight 10" x 12" squares of Ta Dot fabric (used in my toy sacks) leave a comment on this blog post and share what else you could use a toy sack for besides organising toys...

For an extra entry, become a follower of my blog and leave a separate comment to tell me that you follow. If you are already a follower, leave a separate comment telling me so and you will receive an extra entry too.
The giveaway winner will be draw randomly next Monday evening, 28th June and is open to everyone :)
Related Posts with Thumbnails