Saturday, 31 August 2013

.Fancy some weekend cooking?.

Confetti Cookies
Recipe here


Edna's Lemon Curd Teacake
Recipe here
Thermomix recipe here

Melting Moments
Recipe here
Homemade Muesli
Recipe here

Friday, 30 August 2013

.Mabel and George.

I was recently sent some sweet fabric by Sarah Bulkeley of Mabel and George.Sarah is a secondary art and textiles teacher by day and engulfs herself in drawing, fabric design and sewing. Her fabric designs unique and her colour palette is soft and pretty.
Mabel and George fabrics are printed on high quality Kona Cotton by Robert Kaufman perfect for all sewing projects, big or small.
I haven't had much sewing time lately, but have been admiring these lovely prints and hope to work with them sometime soon!
Thanks Sarah for sharing your talents with us!
And blog here.

Thursday, 29 August 2013

.Thermomix Cooking: Choc Peanut Granola.

 
The original recipe for this tasty granola comes from this great blog. I have changed things up a bit and modified the instructions to make the granola in the thermomix before cooking it in the oven.
The end result was less chunky oats and more crunchy clusters - my kids will often screw their noses up at whole oats, but made and cooked this way, they think this granola is a tasty snack! We haven't had it for breakfast, but it is nice to grab a small handful of when you are having a craving for chocolate during the day - fills you up, satisfies the craving, and it's good for you!

Choc Peanut Granola
 
2 apples, peeled
130g peanut butter (I used homemade peanut butter)
100g maple syrup
1 tsp vanilla
1 Tbs milk 
300g rolled oats
20g chia seeds
3 Tbs cacao (or cocoa) powder

Place apples in thermomix. Chop on speed 4 for 10 seconds.
Scrape apple from sides of the bowl. Cook on 100 degrees, speed 2 for 5 minutes until soft. 
Puree on speed 9 for 10 seconds.
Add peanut butter, maple syrup, vanilla and milk to pureed apples. Cook on 80 degrees, speed 1 for 2 minutes.
Add rolled oats, chia seeds and cacao to wet mixture, mix together on speed 4 for 20 seconds. Mixture will be quite wet.
Spread granola onto lined baking trays.
Bake in 160 degree oven for up to 1 hour, stirring to break granola up into little clusters every 10-15 minutes.
Granola will not become hard and crunchy in the oven, it will get crunchy as it cools. To test if granola is ready, take a little bit from the tray and sit on a plate to cool. Test for crunchiness when cool and cook for longer if required.

Thursday, 22 August 2013

.Destash Sale.

Once again my fabric stash overfloweth! I've had a clean out and have some of my fabric for sale on my Facebook page. Check it out here and get in quick!

Tuesday, 20 August 2013

.a fancy ribbon skirt.

My time at the sewing machine is limited at the moment. I can hardly believe I managed to write my book when Tommy was a baby! Having a deadline definitley helped, life was a lot cruiser then too though. We didn't have school drop offs and pick ups, soccer training, home readers, school lunches and all of the other little things that take up your time as your kids get older. Once all of those necessary demands come into play then time just seems to slip away! 

I do love to try and squeeze in a little sewing here and there though, even if it is just a quick 10 minutes at the machine or sorting through fabric to decide what project to tackle when I next have the time. Harvey is an angel, he is fairly predictable and feeds every 3 hours during the day but his day naps are not so good. I think it's probably due to the fact that we are in and out all day with dropping off and picking up kids that he doesn't have a chance to really get into a good sleeping routine. He's into cat-napping and rarely sleeps for more than an 45-60 minutes at a time, I'm hoping that resolves itself as he gets older and has fewer naps that become longer in duration. Needless to say, all of my sewing projects have been quickies lately!

My inspiration for this skirt came from this skirt here. My skirt definitley doesn't compare in detail or workmanship, but we love it all the same and it literally took me under 1 hour to complete!
The actual skirt was super simple - just two rectangles sewn together with an elastic waistband! Sometimes simple is best though, and with all the ribbon busyness I think it works really well.
My ribbon stash is crazy and my ribbon box is overflowing so it felt good to dig around in there and  use up some of them! I sewed the ribbons onto the front of the skirt using a zig-zag stitch between each one before I sewed the skirt together. You can't see it very well, but the hem is sewn down using a decorative crown stitch. Lil asked me if she could get out her textas and colour each crown in a different colour. I said no.
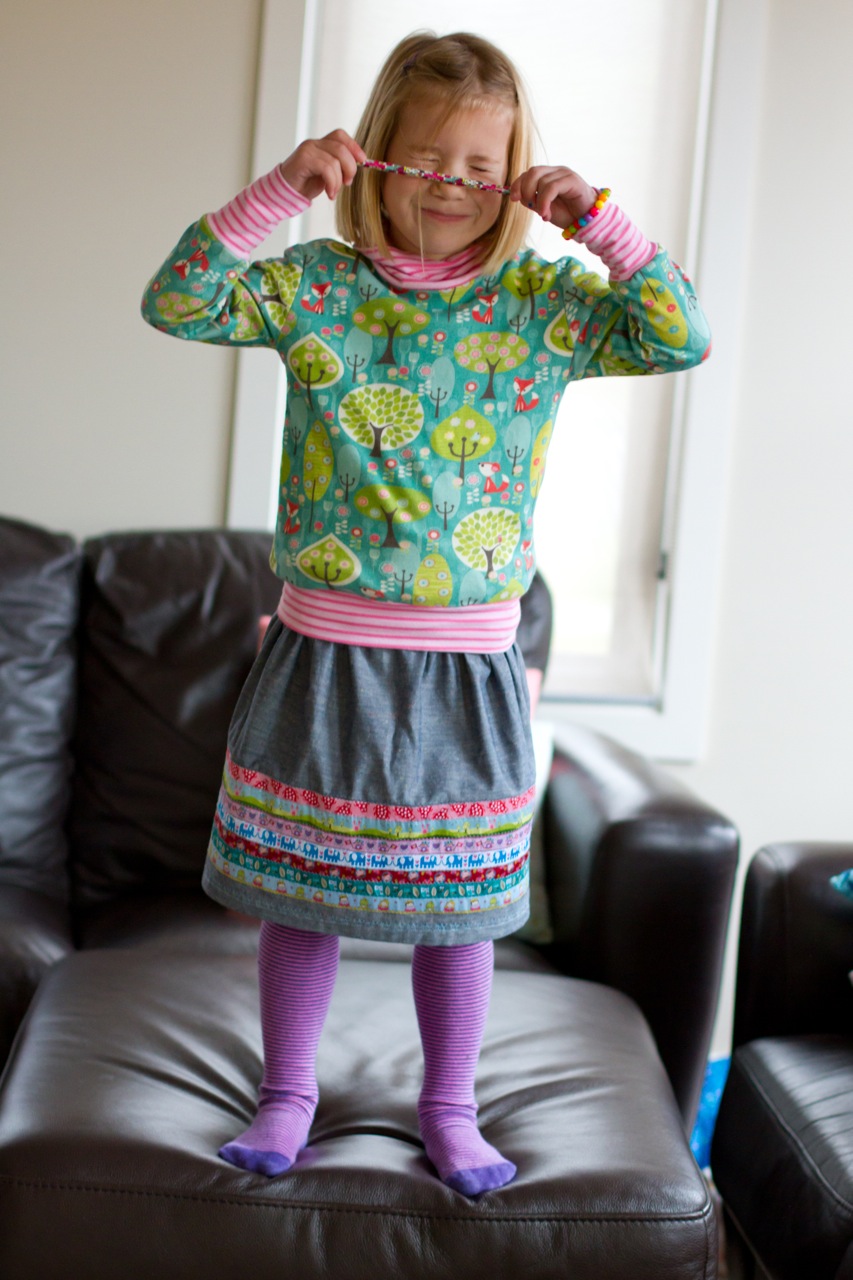
I used a gorgeous chambray fabric from Robert Kaufman for the skirt, it is called "Speck Indigo" and has small flecks of coloured thread through the denim. It is also a nice, lightweight and doesn't crush too badly. I stocked up on a few Robert Kaufman chambray prints because I know they will always come in handy and will be especially useful for sewing clothing for myself.

So there you have it - the story of a quick fancy ribbon skirt!

Thursday, 15 August 2013

.My quest to keep him warm!.

In my quest to keep the boy who only wears shorts and a tshirt warm, another Hero Vest was in order. It has been sitting in his cupboard for 2 months and he has worn it a total of zero times. Which I kind of expected anyway and don't really mind because he can pass it down to Tommy in a few years time and it will still be in perfect condition!
I really just needed to make one in his size to test the fit when I was developing the pattern - having a heap of kids in different sizes really helps for testing pattern sizing!
I used grey knit for the exterior and Hilco fabric for the ribbing. The lime green polar fleece was from Lincraft online.
Oscar did think that it was cool and said he would wear it...if he got cold! We've had some really cold, rainy weather lately so maybe I could trick him into wearing it once or twice before winter is finished just for the satisfaction of seeing him in it!
SUPPLIES:
Make It Perfect, Hero Vest pattern
Stella knit in grey marle
Hilco Ribbing in blue/lime
Polar fleece in lime green 

Tuesday, 13 August 2013

.Thermomix Cooking: Quinoa Porridge.

I always try to have a breakfast that will keep me full up until lunch time and toast and cereals just don't cut it. CADA is still a favourite but I've had it so much that if I overdo it I get sick of it very quickly. A couple of times a week I'll have porridge made with oats for breakfast. I'm not crazy about it, but I keep eating it anyway. It does fill me up, but feels really heavy sitting in my stomach and makes me feel bloated. 
Last week I decided to give quinoa porridge a try. And I'm so glad I did because it is absolutely divine! It is delicious and a bowlful keeps me going for about 4 hours with no yuck, heavy, bloated feeling. I like to sweeten mine with rapadura sugar - maple syrup is good too. You can easily customise this porridge to suit your tastes - have it with or without yoghurt, berries, fruit and nuts. At the moment I'm enjoying a simple banana - and I usually don't eat bananas but they are really good mixed through the porridge!
 
Quinoa Porridge
85g quinoa
125g water
125g milk
1 tsp vanilla
pinch salt
100g milk
2 Tbs sultanas
sweetner of choice (maple syrup, honey, sugar)
fruit/nuts/yoghurt to serve

Before cooking quinoa, you need to wash and rinse it REALLY well to get rid of the naturally-occuring insect repellant the plant produces which causes a bitter taste. Some people like to soak their quinoa for an hour or so first, but I am never that organised so just rinse it through a fine sieve a few times.
Place quinoa, 125g water, 125g milk, vanilla and salt into thermomix. Cook for 15 minutes on 90 degrees, reverse, speed 1.
Add 100g milk and sultanas. Cook for 10 minutes on 100 degrees, reverse, speed 1.
Leave porridge for 5-10 minutes to soak up extra liquid.
Spoon into bowls and add sweetener of choice. Garnish with what ever fruit, yoghurt or nuts you like! 
This recipe makes enough for two serves. I put the second serve in the fridge and re-heat it to eat the next morning.

Wednesday, 7 August 2013

.Butterfly Cowl Neck Basic Tee.


I know I'm on a winning sewing project when the wearer requests more of the same. I loved making my first altered Basic Tee with cowl neck for Lil so happily jumped at the chance to give it a second go.


I love this yellow/grey colour combo. This fabric was actually bought to make something for myself, but I was happy to use it for Lil and we always appreciate the change from pink/purple "girly" colours.
I really want to make one for myeslf, but will wait until I've managed to shed some of the post-baby fat. Basic Tee pattern for women coming up perhaps?
I've already been given the go ahead to make her more of these - I think the cowl neck would look really cute on a short-sleeve or 3/4-sleeve top too for Spring.

SUPPLIES:
Make It Perfect, Basic Tees pattern
Lillestoff Butterfly Women
Lillestoff Ringel in Grey/Yellow

Tuesday, 6 August 2013

.Lil is six.

Our little miss turned six on the weekend. She is a delight and we thought it was time for her to have a special birthday party with some little friends from school. I told her that she could invite six people to her party, and she choose six of her friends but she is such a social butterfly and a couple of days before the party she asked me to go and talk to some of the kids in her class...the kids told me that Lil had asked them to ask me if they could come to the party too! Sneaky little thing! Talk about awkward moment but I somehow managed to weasel my way out of it without ending up with the whole class at our house on a Friday afternoon! She's like that - always full of funny surprises!
I'm ever so grateful for all of the wonderful ideas I have pinned over time...it makes party planning so much easier especially with limited time and a new baby in the house.
We decided on a rainbow theme and used these great printable rainbow invitations. Aren't they cool?
The cake was a rainbow too - really easy to make and all cut from a circle shaped buttercake. I had fun piping the colours of the rainbow - will definitley be getting out the piping bag more for cakes in the future now! It would have been such a pain to wash the piping bag between each colour, Mum came up with the great idea of using the piping bag tip in a little snaplock bag instead so there was no messy washing up - we even coloured the icing in the bag!
For decorations, I made our usual party banner and threaded balloons together to hang up across the dining area.

Lil had the best time at her party and was looking forward to it for so long - here she is blowing out her candles. She had trouble getting them all to blow out and got the giggles!
The party bags had some pretty Citrus Pop clips and a few lollies in them. The girls also got to take home a little paper doll dress up kit. They turned out really cute with little people and animals printed out on cardboard (free download here), a stick of glue and lots of fabric, ribbons, buttons, etc. to cut out and make clothes to stick onto them.

Lil's actual birthday was on Saturday. When we told her we could do anything on her birthday she decided she just wanted to stay home and play with her presents! Which ended up being a good thing because Oscar was sick and it was freezing cold and poured down with rain all day so was nice to shelter at home for the day.
The birthday celebrations continued on until Sunday at family dinner with a big chocolate lolly cake to share. The lolly cake was a birthday tradition in our family as we got older and I can see why now - it is the easiest decorated cake to make and looks and tastes delicious!
Lil is at a really lovely stage at the moment. She has the best sense of humour and loves to have a laugh. She is starting to have more grown-up conversations which is really nice too. And she is a total ditz which always cracks us up! Love you six year old Lil!

Related Posts with Thumbnails